Contributing to AviSynth+
AviSynth+ uses git as its distributed version control system (DVCS) of choice. This document is intended as a basic primer to help users unfamiliar with git, whether they have previously contributed to classic AviSynth (which uses the Concurrent Versions System, a.k.a. CVS), or are completely new to the project. It is not intended as a thorough treatment of any of these commands. For that, you can refer to the Pro Git book.
Installing git
How to install git varies, depending on your operating system.
Windows
Windows users should have installed msys2 first, as described in Compiling AviSynth+
With the msys2/mintty prompt open, install git:
pacman -S msys/git
This is not the only way to install git on Windows, but considering this tutorial is meant to dovetail with the compiling tutorial, this is the recommended way.
Linux
You can install git through your distribution's repositories.
OS X
As per the instructions on the git main site:
Open a Terminal by clicking on Spotlight and typing 'Terminal' (without the quotes). Hit Enter and the Terminal will open. Attempt to run git:
git --version
And it should prompt you to install the Xcode Command Line Tools.
Configuring git
In all of these cases, there's some extra set up of git's configuration that's recommended to make things easier.
git config --global user.name "Your Name"
Use the above command to set your name.
git config --global user.email "email address"
And set your email.
git config --global core.editor "nano"
This will set the default editor as nano. nano is easier for new users to navigate than vim, which is the default editor git uses on some platforms. The editor choice matters because when you go to make a commit, the editor is activated to let you type up a commit message.
git config --global core.whitespace "trailing-space,space-before-tab"
This tells git to warn you about whitespace errors in commits.
git config --global apply.whitespace "fix"
And this will tell git to attempt to fix any whitespace errors that are encountered.
Github
AviSynth+ hosts its code on Github. Users wishing to contribute to AviSynth+ should have their own account on Github as well. Github's own tutorials will assist you in setting up your account and generating the correct authentication signatures, so I won't be covering that part.
Forking
git as a whole relies on the concept of "forking is good", even though the way it plays out in reality is that such forks are more akin to personal branches, not to a 'fork' in the way that projects sometimes break up and part ways (see: AviSynth+ and classic AviSynth, Libav and FFmpeg, LibreSSL and OpenSSL, etc.). Github provides a streamlined way for these personal branches to submit their changes back to the upstream project for inclusion. This is what a 'pull request' is. Of course, any of these personal branches could effect a fork the way that term is traditionally understood, if the changes diverge too much from upstream and/or if upstream rejects the changes for any number of reasons.
Anyway, now that your Github account is set up, navigate to AviSynth+'s repository and click the Fork button.

Github will spawn an AviSynthPlus repository under your account, and give you the command to clone a copy which you can use to push your changes to your personal AviSynthPlus repo on Github.
git clone git@github.com:<username>/AviSynthPlus.git
The command 'git clone' creates a copy of the AviSynth+ source code on your local computer.
Enter the newly-created repo:
cd AviSynthPlus
Remotes
git allows you to keep track of the changes in multiple other repositories at once; these are called 'remotes'.
Logically, the first remote you should track is the upstream project, so that you can grab any changes that occur upstream:
git remote add upstream https://github.com/AviSynth/AviSynthPlus
git fetch upstream
This is a two-step process. Let's break it down: git remote is the name of the main command, 'add' is the command to tell git remote to add a new remote, 'upstream' is the name you're assigning this new remote, and the URL is the location you want to track.
Command |
Subcommand |
Name |
URL |
|---|---|---|---|
git remote |
add |
upstream |
On its own, though, this only sets up the bookmark. It doesn't actually get you the record of the changes.
git fetch is what actually pulls in the record of the changes made to upstream, if any have been made. It also shows a summary of which branches in upstream's repository have been added, changed, or deleted. git fetch does not integrate those changes into the corresponding branches in your personal repository, so you can safely ignore changes that may break your own changes, or if you want to divert a branch from upstream into a differently-named branch locally.
So what happens if there are changes you want to stay current on? Well, let's say that the 'upstream' remote has two branches: master (the default name for the main branch of a repository created with git) and feature, which contains some extra things in the process of being developed.
git merge upstream/master
This will merge the contents of upstream's 'master' branch into the branch you're currently sitting on. If you've not made any changes at all to that branch, it should do a simple fast-forward, appearing as though you'd freshly cloned the repository with those commits already present. If there are any differences, it will end up with a merge commit. In the worst-case scenario, conflicts arise. git provides the mergetool command to help mediate this, but the workflow for handling conflicts is beyond the scope of this primer.
Checkouts
So dealing with master is all good and fine, but what if you want to work with the feature branch? To do that:
git checkout feature
Which will move you onto the feature branch. To move back to master, just use git checkout again:
git checkout master
Branching
Now that you have your own AviSynth+ local repository and have created a remote to track upstream, you want to get to making your changes. To keep the commit history clean, create a new branch with a unique name. While it's possible to do this in two steps by using git branch and then git checkout, it's also possible to do it in one step with just git checkout:
git checkout -b newbranch
This will create a branch from the branch you had just been on. So if you're on master, newbranch will have all of the commits on master up to the point it was created.
Committing
When you've made some changes to one or multiple files, the next step is to commit them. This means that the changes are logged into the git history of the repository, and if warranted, a patch can be created of only those changes.
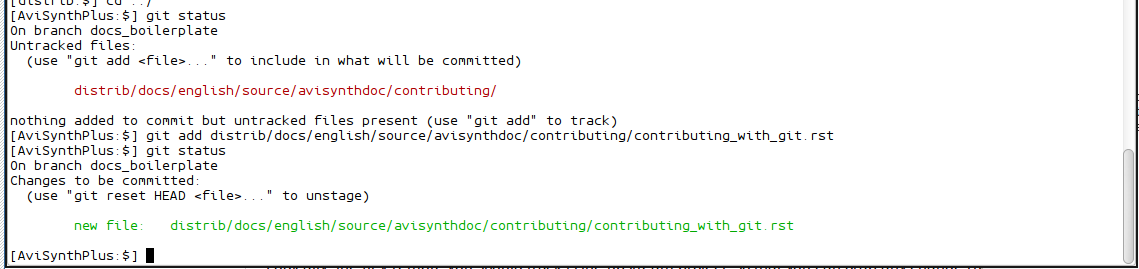
git status
This will show you all files that have been changed.

git add file1 file2
This command tells git to track the changes of those files, readying them for a commit. If you run git status again, the color of the text will have changed from brown to green, with a description prefixed to it:
Alternatively,
git add .
will add all changed files.
git commit
Will do the actual commit (you can also combine git add . and git commit into one step by using git commit -a). At this point, nano (or the text editor of your choice) will appear:
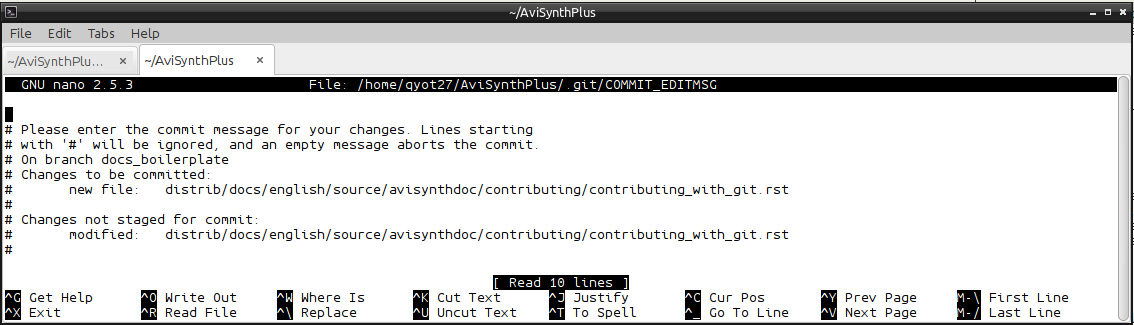
Type in a descriptive message about the changes, and then tell nano to exit (Ctrl+X), which will prompt you to approve the changes before it commits them. Preferably, the commit message should be formatted like this:
*area*: *short description*

*long description, if necessary*
The short description should fall below the 80-character margin the rest of the text in nano adheres to. It makes it nicer for those browsing the log.
Make sure that changes are topical. Don't throw unrelated changes into the same commit. Whitespace and formatting changes should always be in separate commits unless it happens to be a consequence of the exact change made (a single space or newline disappearing amidst changes all around it is one thing, but all the rest of the whitespace in the file changing at once with unrelated changes interspersed throughout it is not okay).
Pushing
Pushing is the act of uploading the changes you've made to your repository to the publically-available URL that everyone else can see (in our case, your Github account).
git push origin <branchname>
Where <branchname> is the name of the branch you're making available or updating.
Creating a pull request
Now that you have your changes pushed up onto Github, you can make a pull request of these changes back to AviSynth+.
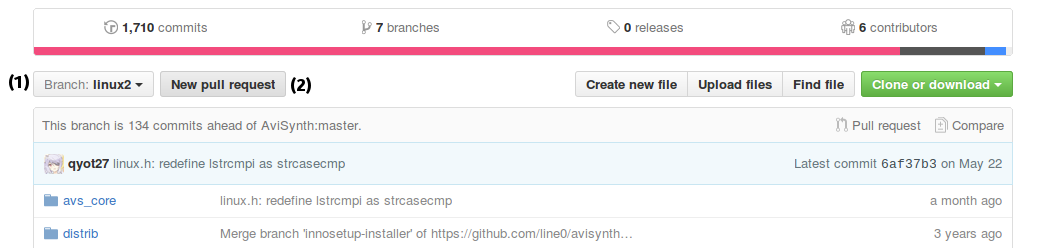
On your personal AviSynth+ repository, use the 'Branch' button (1) to select the branch you want to create a pull request from. Then hit the 'New pull request' button (2) to have Github create the pull request for you.
On the 'Open a pull request' page you can select exactly which branch and fork the pull request should go to. Write up a short title to describe the changes you've made, and in the comment box, write a longer and more thorough description if you feel it's necessary (or if you were overly vague in the title). Finally, click the 'Create pull request' button, and the pull request will be made.
The project administration can then review your changes and suggest fixes that might be needed. If you add additional commits to your branch that you opened the pull request with, then the new commits will show up in the pull request.
Back to the main page
$Date: 2016-07-04 16:51:06 -04:00 $
